Deployment of Computer Vision models with Django on AWS EC2
The aim of this tutorial is to demonstrate how to deploy ML and CV models using Django.
I have gone through the process of deploying ML models in a Django website, on AWS EC2 instances. The process is a bit tedious and full of small details, so I thought to share my experience.
The target is not to have the best and most secure website, so there are a lot of security issues, non-standard web development practices, simple styles,…etc. The main target here is to demonstrate the process of deploying ML model in a website using AWS EC2.
Layout of the tutorial
- Local/dev side
- ML models side
- Django framework side
- Server side
- Website settings
- Remote server setup/Apache configuration
- Remote instance (EC2) choice
Local development side
ML/CV tasks
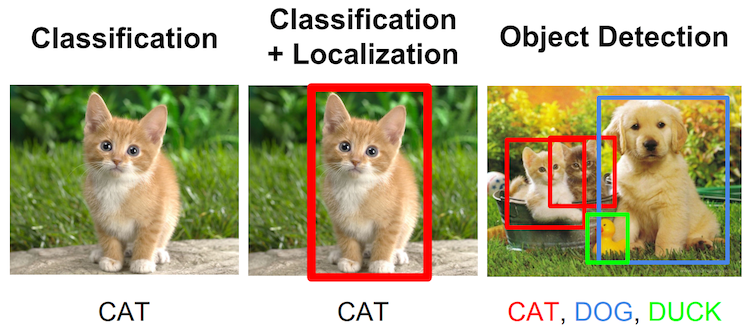
Source: Stanford Course CS231n. Url: https://ml4a.github.io/images/figures/localization-detection.png
We will demo three computer vision tasks, where in each of them the website asks to load an image, and it produces the corresponding output.
Since our target is just to demo the deployment, we use pre-trained models. Note that: all the steps mentioned are still applicable in case of custom trained models. We use examples from the top two ML frameworks: Tensorflow/Keras and Pytorch.
The tasks demonstrated are (click on each to see the corresponding colab):
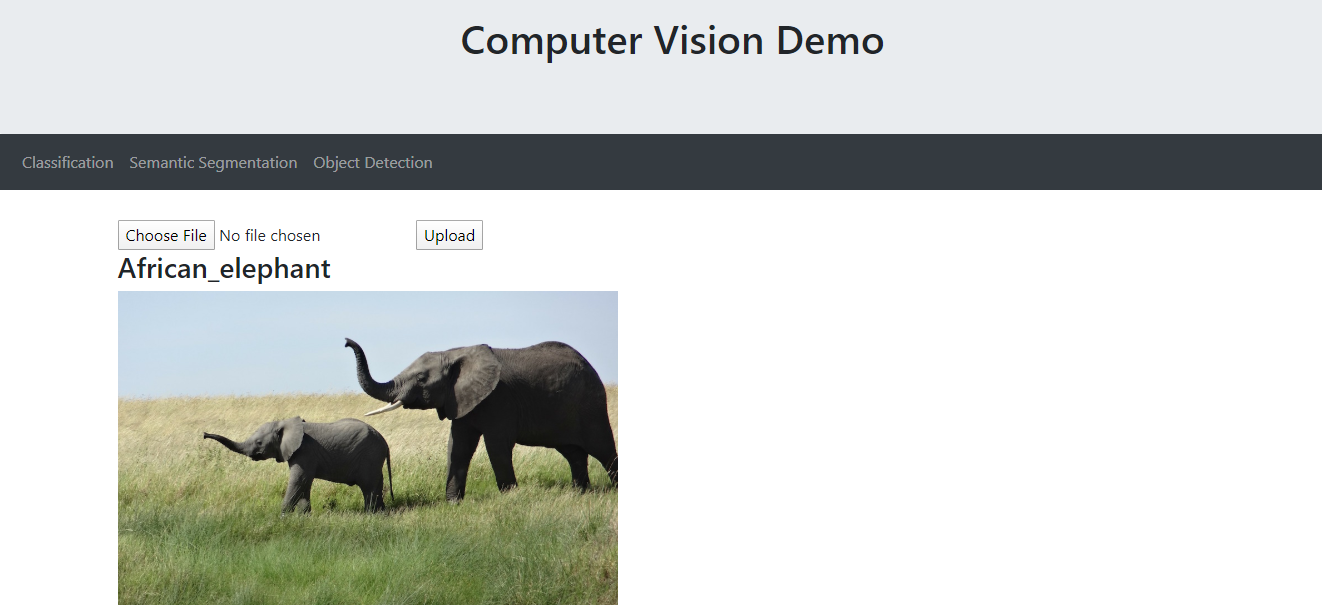
- Classification: We use pre-trained VGG model with Keras. Details can be found in this colab.
The user loads and image, and gets a class representing the most dominant object class in the image, according to ImageNet dataset classes.
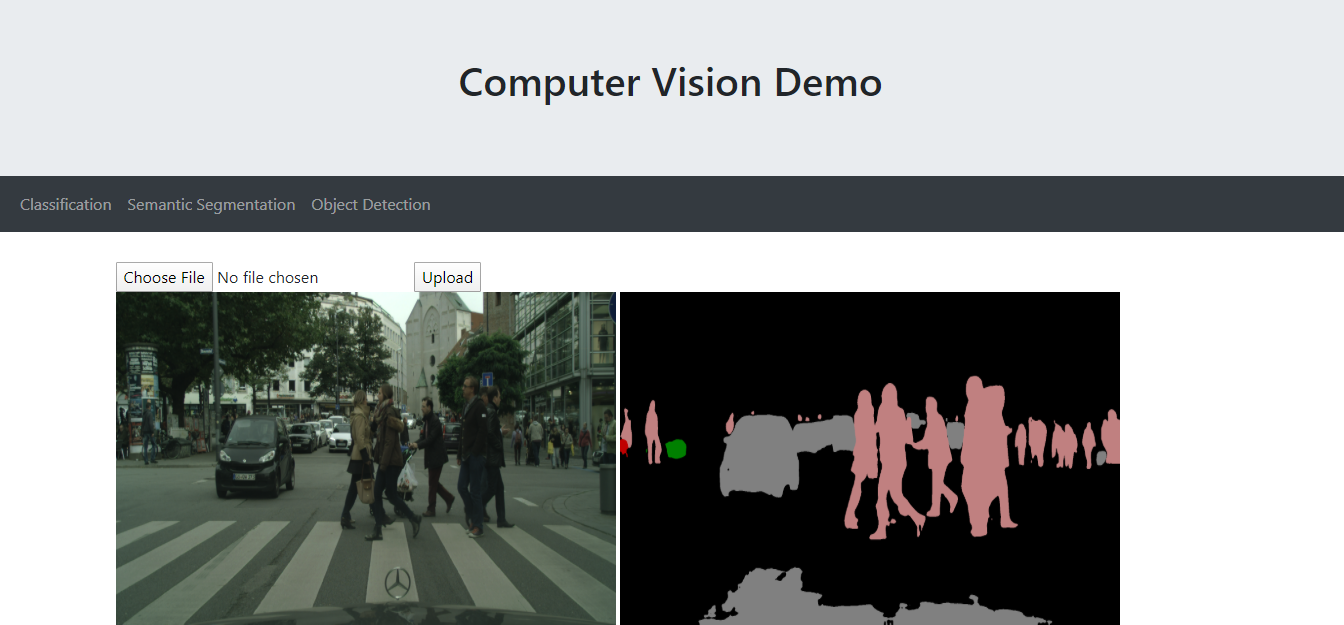
- Semantic segmentaion: We use pre-trained FCN model from torchvision. Details can be found in this colab.
The user loads and image, and gets an image that represent the semantic pixel wise mask of all the classes in the image according to COCOO dataset classes:
['__background__', 'aeroplane', 'bicycle', 'bird', 'boat', 'bottle', 'bus',
 'car', 'cat', 'chair', 'cow', 'diningtable', 'dog', 'horse', 'motorbike',
 'person', 'pottedplant', 'sheep', 'sofa', 'train', 'tvmonitor']
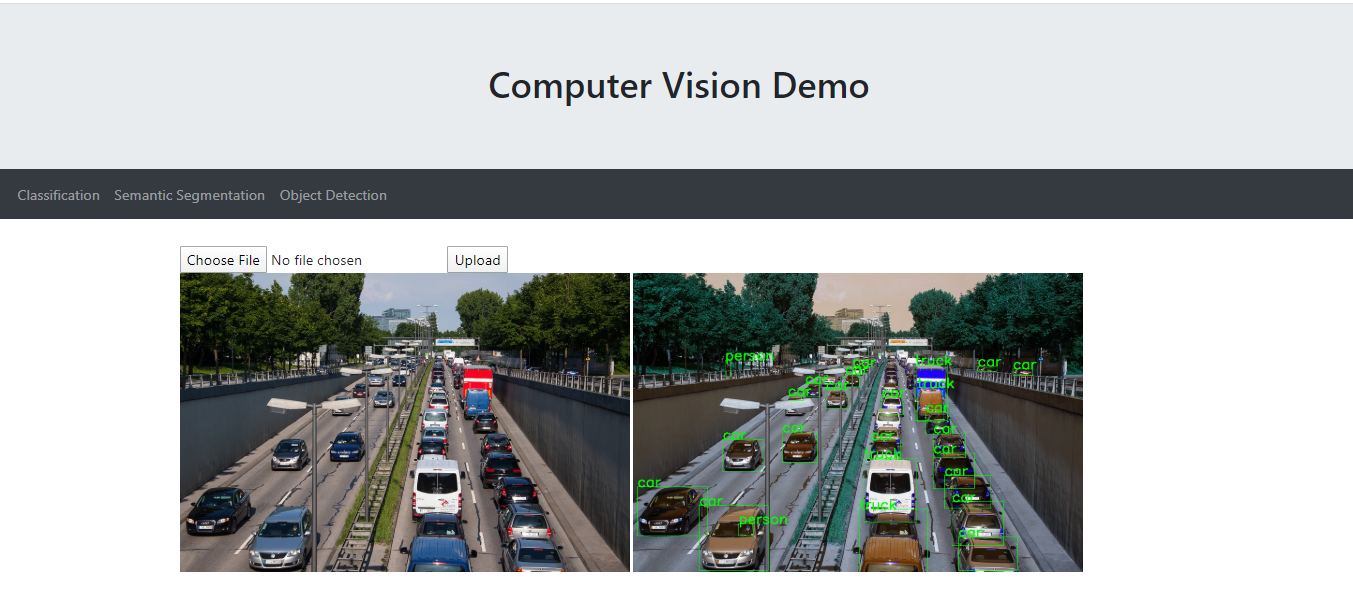
- Object detection: We use pre-trained Faster R-CNN model from torchvision. . Details can be found in this colab.
The user loads and image, and gets an image with single/multiple objects detected with an Object Bounding Box (OBB), and its class name, with certainity more than 80% (threshold). Classes are from COCOO dataset object detection classes:
[
    '__background__', 'person', 'bicycle', 'car', 'motorcycle', 'airplane', 'bus',
    'train', 'truck', 'boat', 'traffic light', 'fire hydrant', 'N/A', 'stop sign',
    'parking meter', 'bench', 'bird', 'cat', 'dog', 'horse', 'sheep', 'cow',
    'elephant', 'bear', 'zebra', 'giraffe', 'N/A', 'backpack', 'umbrella', 'N/A', 'N/A',
    'handbag', 'tie', 'suitcase', 'frisbee', 'skis', 'snowboard', 'sports ball',
    'kite', 'baseball bat', 'baseball glove', 'skateboard', 'surfboard', 'tennis racket',
    'bottle', 'N/A', 'wine glass', 'cup', 'fork', 'knife', 'spoon', 'bowl',
    'banana', 'apple', 'sandwich', 'orange', 'broccoli', 'carrot', 'hot dog', 'pizza',
    'donut', 'cake', 'chair', 'couch', 'potted plant', 'bed', 'N/A', 'dining table',
    'N/A', 'N/A', 'toilet', 'N/A', 'tv', 'laptop', 'mouse', 'remote', 'keyboard', 'cell phone',
    'microwave', 'oven', 'toaster', 'sink', 'refrigerator', 'N/A', 'book',
    'clock', 'vase', 'scissors', 'teddy bear', 'hair drier', 'toothbrush'
]
Django framework
Why Django
Django provides a full framework, to develop both backend and front end parts of a website, in Python. Flask is easier, but requires some extra effort to add front end part.
To start a demo website, the easiest way is to follow the official Django tutorial here
Bootstrap
We use bootstrap for the styles and “look and feel”.
We add the following on top our base.html, which we extend in all our templates (see below):
  <!-- Bootstrap CSS 4.3.1 -->
	<link rel="stylesheet" href="https://maxcdn.bootstrapcdn.com/bootstrap/4.3.1/css/bootstrap.min.css">

	<!-- jQuery library -->
	<script src="https://ajax.googleapis.com/ajax/libs/jquery/4.3.1/jquery.min.js"></script>

	<!-- Latest compiled JavaScript -->
	<script src="https://maxcdn.bootstrapcdn.com/bootstrap/4.3.1/js/bootstrap.min.js"></script>
Install Django
pip install django
Start a project
Now we create our deployment project inside the repo main folder (CV):
django-admin startproject deployment
This will create the basic website files, like the entry point of the landing page, urls routing,..etc. But no applications yet.
Add our Computer Vision (CV) application
Here we create our computer vision 3 tasks application:
python manage.py startapp cv
This will create the application files, like the urls routing, backends (views),…etc
In the current repo, we also have another app, which is taking video, and predicting semantic segmentation and object detection for the whole video, called cv_vid:
python manage.py startapp cv_vid
Now we created the project skeleton:
- CV
- deployment
- deployment
- cv
- cv_vid
- deployment
Below, we configure the important parts for our website to work.
URLs routing
Here we configure the routes of our website.
We have a main application route:
deployment/urls.py
from django.conf import settings

urlpatterns = [
    path('cv/', include('cv.urls')),
]


urlpatterns += static(settings.MEDIA_URL, document_root=settings.MEDIA_ROOT)
The last line is particularly important, since the MEDIA_URL is the path to the /media/ directory, which has all the image files (input and output), that the code will use. So it’s impartant to have that URL configured so that the templates can find those images when passed from the backend. In other words, the /media/ directory is the link or shared space the links the backend and the front end.
And 3 sub-apps routes representing our 3 tasks: deployment/cv/urls.py
from django.urls import path

from . import views

urlpatterns = [
    path('', views.base, name='base'),
    path('classification', views.classification, name='classification'),
    path('semantic_segmentation', views.semantic_segmentation, name='semantic_segmentation'),
    path('object_detection', views.object_detection, name='object_detection')
]
The configured urlpatterns will set the default landing page to the base.html, which will be rendered using the backed function views.base. This is simply rendering the base.html template.
Front-end
The base.html has the main navigation bar. When the user clicks any of the tasks, the website is routed to the required backend:
    <ul class="navbar-nav">
      <li class="nav-item">
        <a class="nav-link" href="classification">Classification</a>
      </li>
      <li class="nav-item">
        <a class="nav-link" href="semantic_segmentation">Semantic Segmentation</a>
      </li>
      <li class="nav-item">
        <a class="nav-link" href="object_detection">Object Detection</a>
      </li>
    </ul>
Each href above will route to the configured url. In cv/urls.py we already configured which backend handler will take care of those.
In this way, this is the main maestro of the app routes.
templates
We need front end html files that handle the requests or urls above. Those reside in the cv/templates/cv folder.
For django to be able to find your custom templates, you must edit the TEMPLATES variable in settings.py as follows:
TEMPLATES = [
    {
        ...
        'DIRS': [os.path.join(BASE_DIR, 'cv/templates'),os.path.join(BASE_DIR, 'cv_vid/templates')],
	...
base.html This is just a fancy website theme, that all the other 3 tasks templates inherit from. It uses bootstrap for a modern look and feel.
classification.html
This one will have an upload file form, and output processing part that renders the uploaded image + the returned prediction:
	{% extends 'base.html' %}


	{% block content %}

	<form method="post" enctype="multipart/form-data">
	    {% csrf_token %}
	    <input type="file" name="myfile">
	    <button type="submit">Upload</button>
	  </form>


	  {% if original_img %}
	  <h3>{{prediction}}</h3>
	  <img src="{{ original_img }}" alt="Prediction" width="500" height="333">

	  {% endif %}


	{% endblock %}
semantic_segmentation.html This one will have an upload file form, and output processing part that renders the uploaded image, and the segmented image that is passed from the backed:
{% block content %}

<form method="post" enctype="multipart/form-data">
    {% csrf_token %}
    <input type="file" name="myfile">
    <button type="submit">Upload</button>
</form>


{% if original_img %}
<img src="{{ original_img }}" alt="Original" width="500" height="333">

{% endif %}

{% if segmented_img %}
<img src="{{ segmented_img }}" alt="Segmented" width="500" height="333">

{% endif %}


{% endblock %}
object_detection.html
This is similar to the semantic_segmentation.html template
Backend
cv/views.py
Configure the 3 tasks call backs. This where all the action happens, or the backend
Each of one those does the following:
- handles the
POSTrequest of the upload button. If not file uploaded, the basic template (without predictions) is rendered. - passes the uploaded image file to the prediction model.
- renders back the html template with the returned prediction from the model. In cases of object detection and segmentation, those are the paths of the saved images.
def classification(request):
    if request.method == 'POST' and request.FILES['myfile']:

        myfile = request.FILES['myfile']
        fs = FileSystemStorage()
        filename = fs.save(myfile.name, myfile)
        img_file = fs.url(filename)

        pred = #make prediction
        return render(request, 'cv/classification.html', {'original_img': img_file,
                                                            'prediction': pred})

    return render(request, 'cv/classification.html')
def semantic_segmentation(request):
    if request.method == 'POST' and request.FILES['myfile']:

        myfile = request.FILES['myfile']
        fs = FileSystemStorage()
        filename = fs.save(myfile.name, myfile)
        img_file = fs.url(filename)

        seg_file = #get_segmentation

        return render(request, 'cv/semantic_segmentation.html', {'original_img': img_file,
                                                                 'segmented_img': '/media/seg_img.png'})

    return render(request, 'cv/semantic_segmentation.html')
def object_detection(request):
    if request.method == 'POST' and request.FILES['myfile']:

        myfile = request.FILES['myfile']
        fs = FileSystemStorage()
        filename = fs.save(myfile.name, myfile)
        img_file = fs.url(filename)


        obb_file = #detect objects


        return render(request, 'cv/object_detection.html', {'original_img': img_file,
                                                            'obb_img': '/media/obb_img.png'})

    return render(request, 'cv/object_detection.html')
Deploy local
cd CV/deployment
python manage.py runserver
Now of you in the browser to:
127.0.0.1:8000/cv
You will see the website up and running.
Collect requirements.txt
Eiter you are working inside a virtual environmment, in which case you just need to:
pip freeze requirments.txt
Or if you just work with system-wide python, or conda environment, then you can use pipreqs:
pip install pipreqs
cd <project_dir>
pipreqs .
This will get the requirements.txt
Push to git
You first need to add git:
cd <project_dir>
git init
Now, if you work on github or any other git framework remote host, you need to add this to your remote:
git remote add <remote repo url>
Now we push to git:
git add *
git commit -am"commit msg"
git push origin
Now you are good to go to the server to deploy from there.
Server side
Deploy on AWS EC2
EC2 Instance Choice
- Create AWS account
- Log on and go to EC2
-
Launch new instance

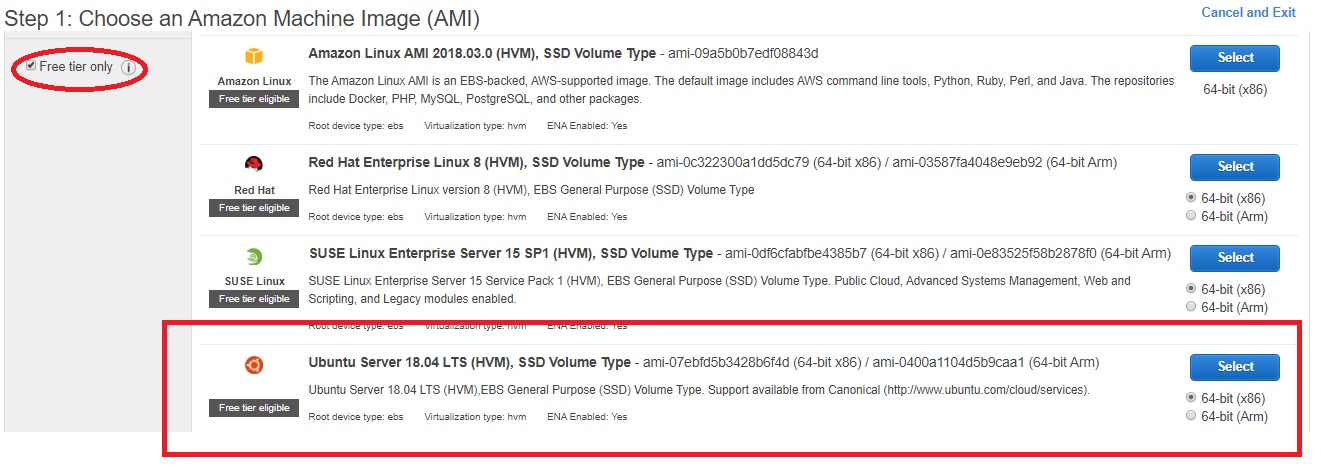
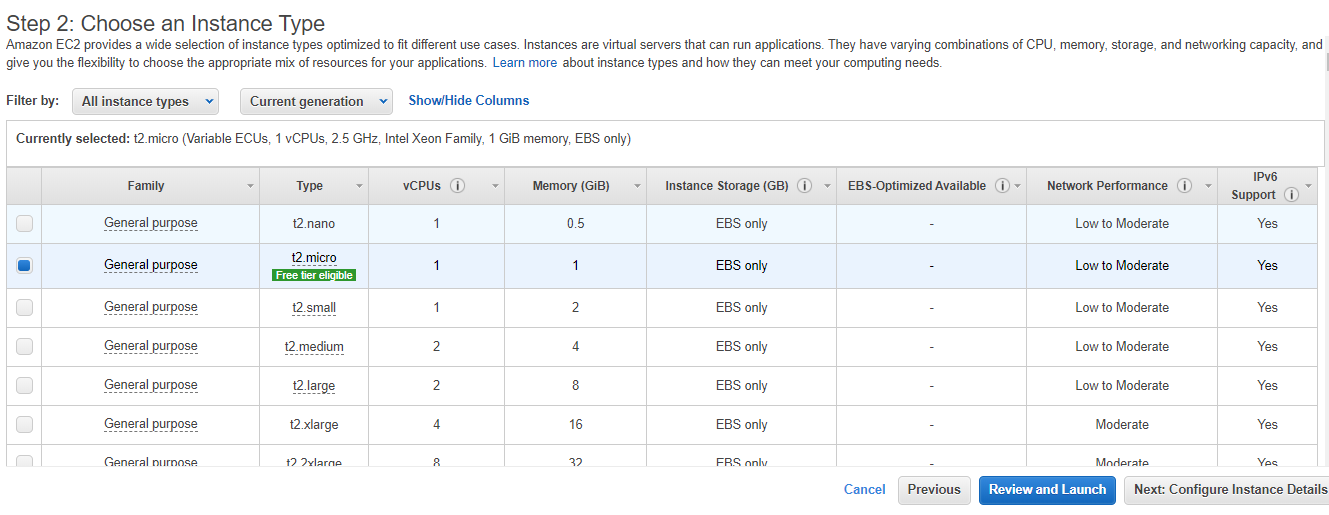
- Choose Free tier (unless you want to buy strong computation, check pricing)
- Choose Ubuntu instance
-
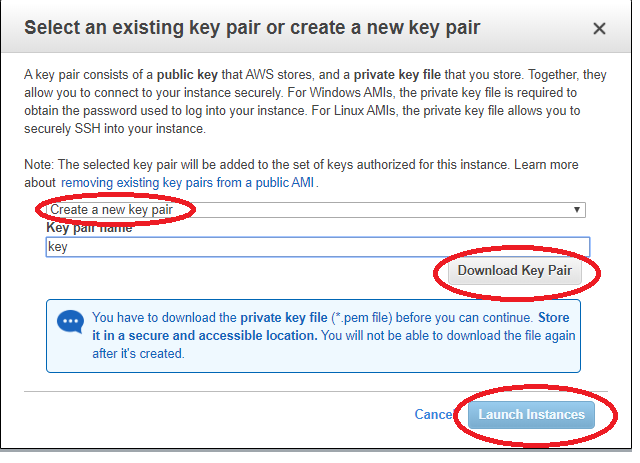
Choose private key. Keep the private key, otherwise you won’t be able to access the instance via SSH.
-
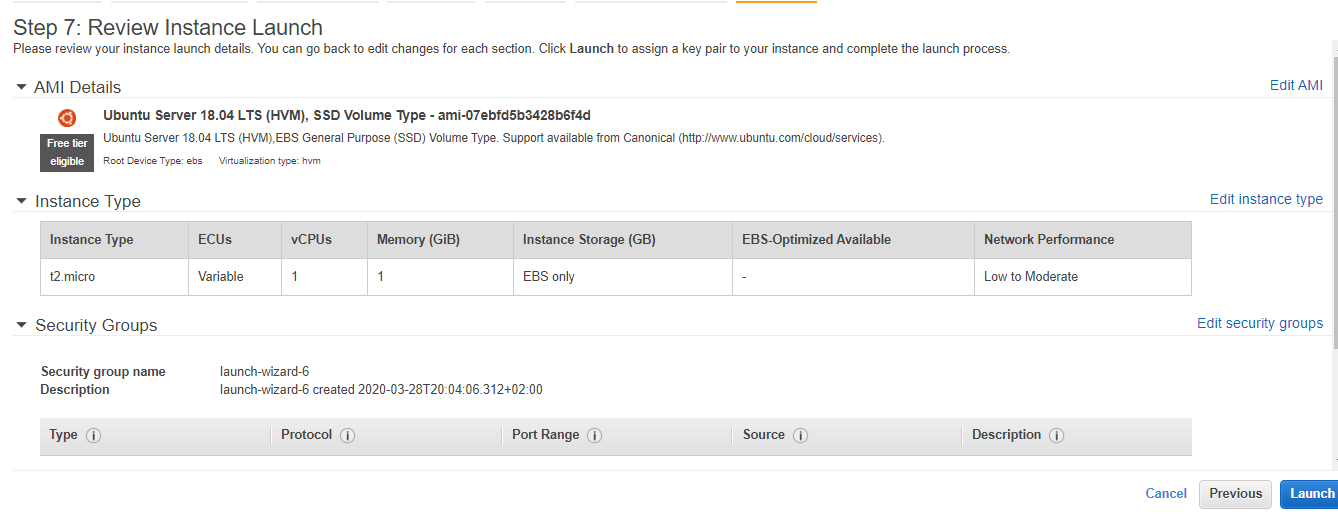
Review and Launch
-
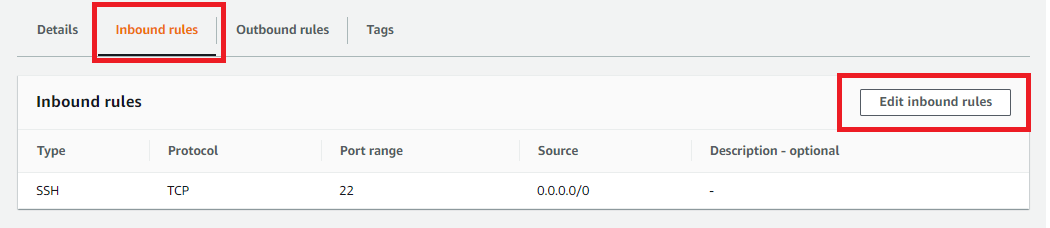
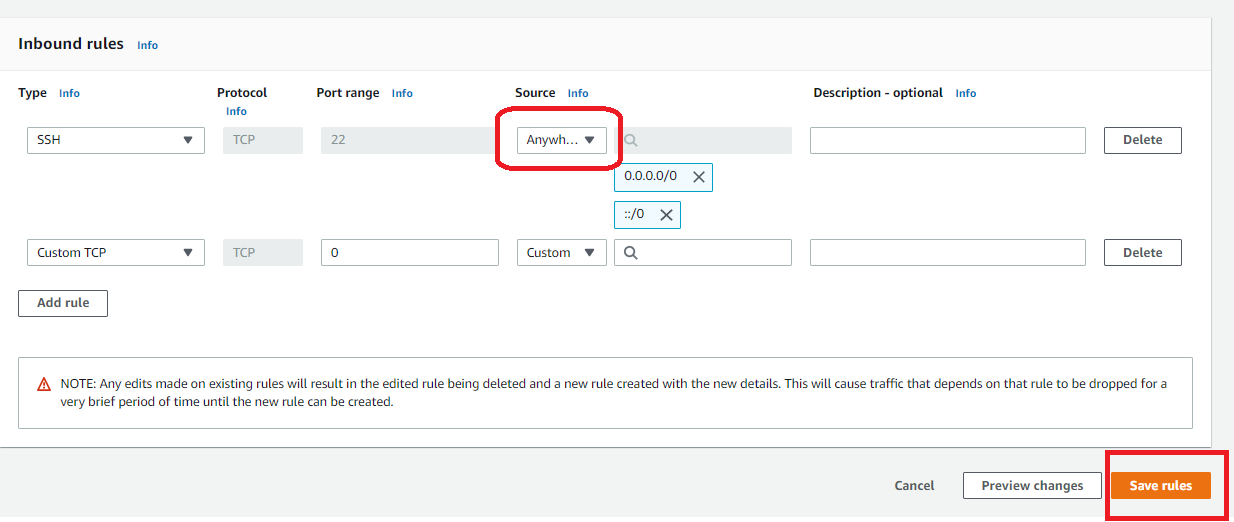
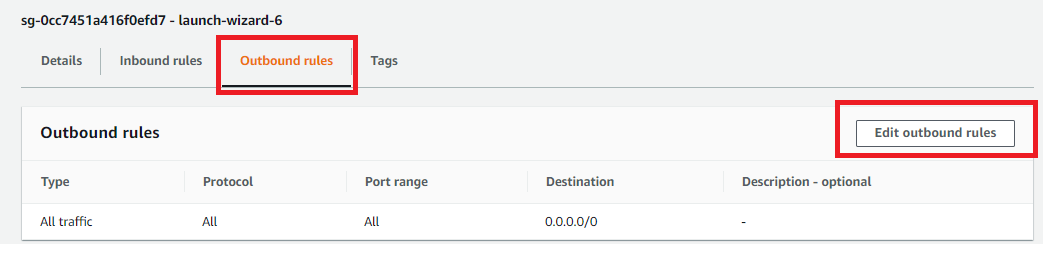
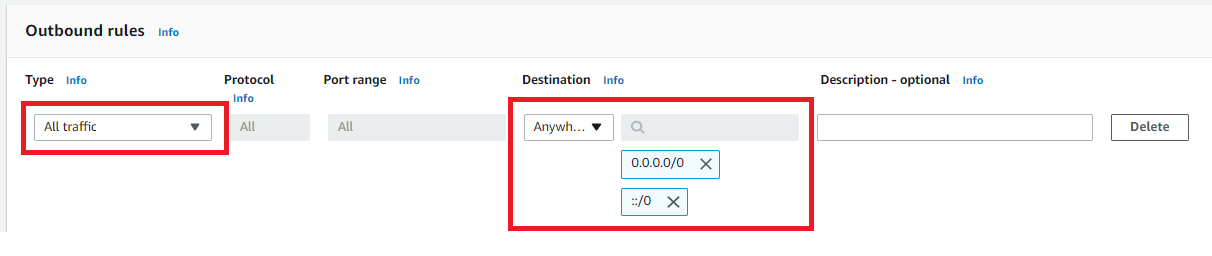
Configure the security policy. Enable ALL traffic on inbound and outbound rules.

Make sure to add for Custom TCP as well as SSH for both inbound and outbound, and add port range 8000 in inbound rules.
EC2 Instance Setup
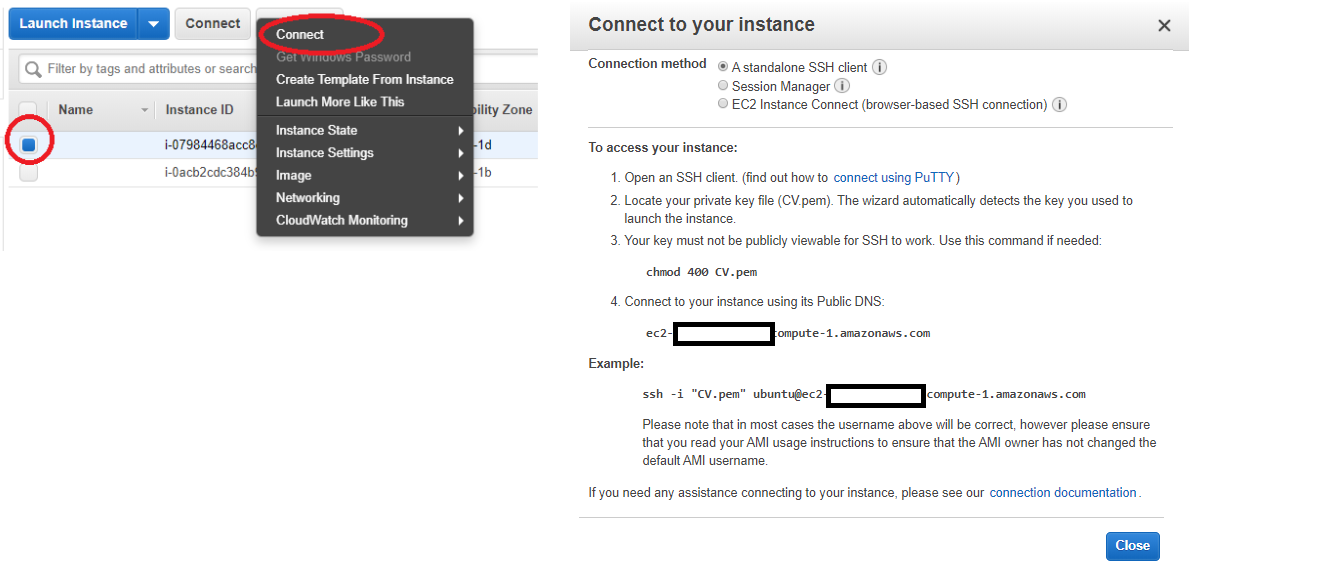
Connect/SSH to your instance
Command line:
If you press “Connect” in the EC2 console you get clear instructions, make sure to choose the instance. Doing so is just fine to ssh. However, you still to connect FTP client to download and upload files to the instance. PUTTY can be used.
But in this way you need to do different steps for FTP and SSH.
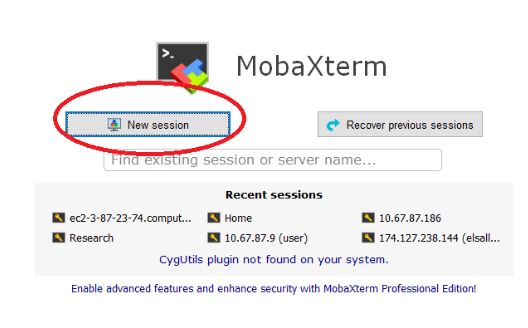
MobaXTerm:
I found MobaXTerm a conventient 2-in-1 alternative. Here’s how to use to connect to your instance:
-
New session
- Configure the ip=dns name and user=ubuntu
-
Add private key, which you saved when creating the instance
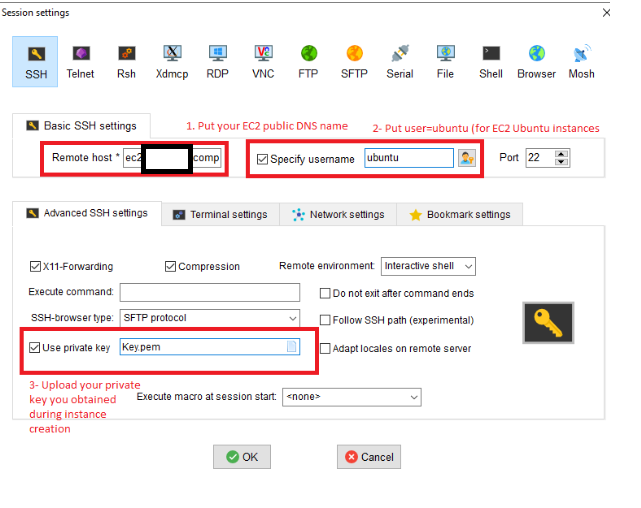
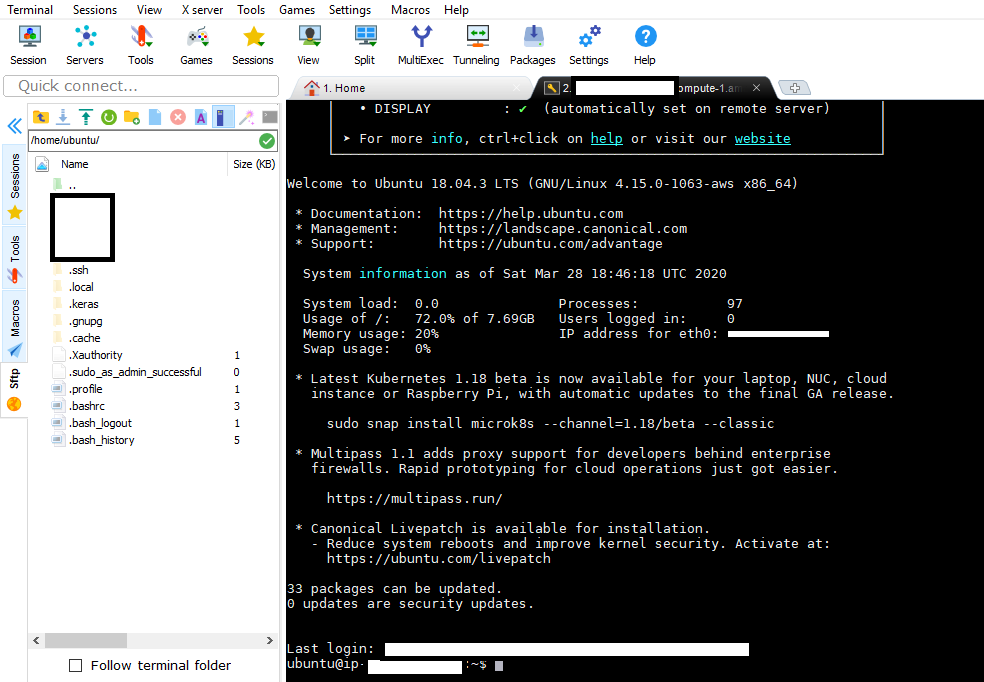
- Now you are connected!
Prepare the basic packages:
sudo apt update & sudo apt upgrade
sudo apt install python3-pip
python3 -m pip install --upgrade pip
Try demo website
At this point, it’s nice to start a demo django website to make sure your instance is accessible:
sudo apt install python3-django
mkdir website
cd website
django-admin startproject deployment
cd deployment/
python3 manage.py runserver 0.0.0.0:8000
sudo ufw allow 8000
python3 manage.py runserver 0.0.0.0:8000
You will get an error like:
Invalid HTTP_HOST header: 'ec2-XXXX.compute-1.amazonaws.com:8000'. You may need to add 'ec2-XXXX.compute-1.amazonaws.com' to ALLOWED_HOSTS
Modify your settings file to enable the remote host IP:
ALLOWED_HOSTS = ["server_domain_or_IP"]
Now, you will notice if you closed SSH, the website is down. As a workaround, we can run the server in the background using the screen command:
screen python3 manage.py runserver 0.0.0.0:8000
Then Ctrl+a+d to detach the screen. Now the website will keep running.
If you want to stop at any time, just ssh to the instance, and see the running processes ps -a or screen -ls, and kill it (usually it is a python or python3 process). You can kill with screen screen -X -S [process name, ex: 32803.pts-0.ip-172-31-29-101] quit
Your own wbesite
Now get the code to the server
git clone https://github.com/ahmadelsallab/CV.git
Virtual env
We need our code to run inside a virtual environment, since we will need this later in Apache configuration. This will contain the python interpreter and all the site-packages we need for the project.
pip install virtualenv
Now create and activate the env
virtualenv venv

source venev/bin/activate
In python3:
python3 -m venv /path/to/new/virtual/environment
Now inside the venv, we install the requirements
pip install -r requirements
Exceptions for manual installation:
- System wide packages:
sudo apt install python3-opencv - Memory error tensorflow:
pip install --no-cache-dir tensorflow
Using Django Dev server
- On the server side:
sudo ufw allow 8000
python manage.py runserver 0.0.0.0:8000
Modify your settings file to enable the remote host IP:
ALLOWED_HOSTS = ["server_domain_or_IP"]
- On the local side: connect to your remote machine in SSH as described, then in the browser, open the
ip_address:8000/cvordns_name:8000/cv, you will see the website up and running.
What’s wrong with this approach? You need to keep connected with SSH to the machine. If it’s closed, the website is down.
Apache and mod_wsgi
We use Apache to prevent the above problem, and have a permenant server listening to our website requests even is SSH disconnects.
- Apache = a server program to listen on server ports and serve requests
- mod_wsgi = python wrapper package to run python based websites on the server
All details can be found here Assuming you work with Python3
- Setup packages for apache2 and mod_wsgi
sudo apt-get update
sudo apt-get install python3-pip apache2 libapache2-mod-wsgi-py3
Apache configuration
All details can be found here
Now you need to edit the apache2 configuration file:
sudo nano /etc/apache2/sites-available/000-default.conf
This file tells Apache which entry point to serve, when called with a certain url. You need to add the following:
<VirtualHost *:80>

    ....

    <Directory /home/<user>/<project_directory>/CV/deployment/deployment/>
        <Files wsgi.py>
            Require all granted
        </Files>
    </Directory>

    WSGIDaemonProcess cv python-home=/home/<user>/<venv_directory> python-path=/home/<user>/<project_directory>/CV/deployment/deployment
    WSGIProcessGroup cv
    WSGIScriptAlias / /home/<user>/<project_directory>/CV/deployment/deployment/wsgi

</VirtualHost>
The important parts are WSGIScriptAlias, which sets the entry point when the user goes to the
Restart Apache:
sudo systemctl restart apache2
If failed, you can check syntax using:
apachectl configtest
For any error log:
cat /var/log/apache2/error.log
Go to the browser, open the ip_address/cv or dns_name/cv, you will see the website up and running.